
Tuesday, June 3, 2008
Monday, June 2, 2008
Movement Trays
So I'm planning to start modeling up a new warhammer army in August and I was interested in making some very "diorama-esque" movement trays. The theme for the army is a race of sea-faring plunderers, like the Vikings. So I wanted to try my hand at making some 100mm x 100mm trays that would be the bow of boats. I meant to do photo's as I went along but I got way too in to the project and forgot to pause.
The first challenge was figuring out how to make a solid keel. I went through plenty of 3/4" thick balsa before I finally threw in the towel and upgraded to a harder basswood. Even then, I had to make a few modifications to my original design before I found a structure that would handle the strain caused by the the bending of the balsa side boards.
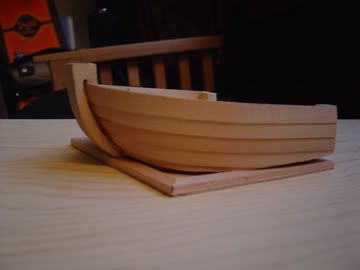
For my first incarnation I decided to put the sideboards on each side separately, I call this ship Cutter because is has a very typical look down the length of the side and front, here the pictures of Cutter:


In general I was happy with Cutter but I knew I could make improvements. Most notably, if you were to look at Cutter from the top you would notice one flagrant flaw, it's not symmetrical. This is because I chose to plank each side separately and as a result there was a difference in the strain on each plank from each side. I decided to give it another go and this time to thread one long sheet of balsa through the prow and then bend them back like the bending of a bow. At first this snapped the balsa planks, so I had another problem to solve. I decided to put some in the kettle and try to shape the planks as I passed steam over them (I remembered seeing this in a documentary on ship building). It worked like a charm (aside from the burned fingers), by using the steam as I shaped the planks around the keel I was able to achieve a very uniform and fluid looking shape.
I especially liked the way that each plank curved upwards out from the prow and then took a downward curve towards the side. I decided to call this ship Reaver as the curvature of the planking seemed to imply something as chaotic as it was natural. Here are a few more pics of Reaver:
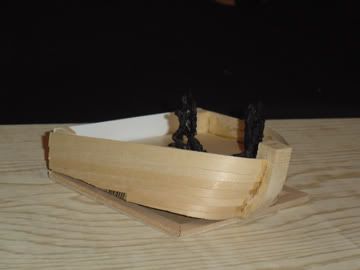


As you can see from the last photo, Reaver is almost perfectly symmetric down the keel.
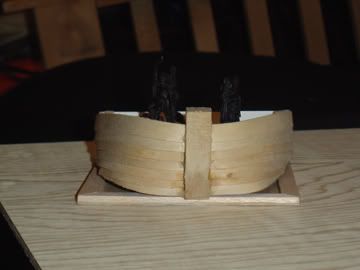
Ranked up units fit in these ships as usual with the exception that the outer most models of the first two ranks will lie outside the ship (so 4 models total). I plan to model these figures hanging off of ropes with their feet braced against the side of the ship, as though they're preparing to board another ship.
I definitly have to make a few more of these and I'm still trying to figure out how I could make each individual ship part of a large whole, in terms of army appearance and display purposes. I'm not sure if I want to put calvary on these types of trays so I might do them on a beach with water running up the sand like surf.
The first challenge was figuring out how to make a solid keel. I went through plenty of 3/4" thick balsa before I finally threw in the towel and upgraded to a harder basswood. Even then, I had to make a few modifications to my original design before I found a structure that would handle the strain caused by the the bending of the balsa side boards.
For my first incarnation I decided to put the sideboards on each side separately, I call this ship Cutter because is has a very typical look down the length of the side and front, here the pictures of Cutter:
In general I was happy with Cutter but I knew I could make improvements. Most notably, if you were to look at Cutter from the top you would notice one flagrant flaw, it's not symmetrical. This is because I chose to plank each side separately and as a result there was a difference in the strain on each plank from each side. I decided to give it another go and this time to thread one long sheet of balsa through the prow and then bend them back like the bending of a bow. At first this snapped the balsa planks, so I had another problem to solve. I decided to put some in the kettle and try to shape the planks as I passed steam over them (I remembered seeing this in a documentary on ship building). It worked like a charm (aside from the burned fingers), by using the steam as I shaped the planks around the keel I was able to achieve a very uniform and fluid looking shape.
I especially liked the way that each plank curved upwards out from the prow and then took a downward curve towards the side. I decided to call this ship Reaver as the curvature of the planking seemed to imply something as chaotic as it was natural. Here are a few more pics of Reaver:
As you can see from the last photo, Reaver is almost perfectly symmetric down the keel.
Ranked up units fit in these ships as usual with the exception that the outer most models of the first two ranks will lie outside the ship (so 4 models total). I plan to model these figures hanging off of ropes with their feet braced against the side of the ship, as though they're preparing to board another ship.
I definitly have to make a few more of these and I'm still trying to figure out how I could make each individual ship part of a large whole, in terms of army appearance and display purposes. I'm not sure if I want to put calvary on these types of trays so I might do them on a beach with water running up the sand like surf.
Subscribe to:
Posts (Atom)
